pg-residency Archives - Page 3 of 9 -

Subtrochanteric Fractures: A Masterclass on Intramedullary Nail Fixation for PG Residents 
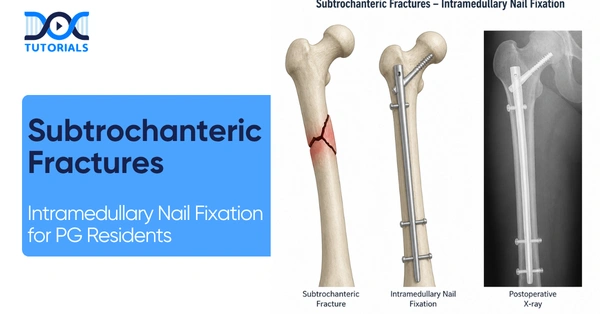
Intramedullary Nail Fixation for PG Residents

The subtrochanteric region represents a high-stress transition zone where profound biomechanical understanding is far more critical than isolated anatomical knowledge. For Orthopedics Post-Graduate (PG) Residents preparing for their exams and clinical practice, mastering these complex injuries requires a thorough grasp of the immense deforming forces at play and the meticulous application of an intramedullary nail. 

Get High Quality, High Yield Orthopedics PG Residency Notes for Free! 

Understanding the Anatomical Transition Zone 

Before evaluating surgical implants like the intramedullary nail, it is imperative to strictly define the anatomical zone. A subtrochanteric fracture is defined as a fracture located entirely below the trochanters.  

The proximal boundary of this region is the lesser trochanter, and the distal boundary is defined as exactly 5 cm distal to the lesser trochanter. This specific area acts as the transition zone to the femoral shaft. Any extension of the fracture line beyond this 5 cm mark changes the primary classification of the injury. Due to the biomechanical demands of this transition zone, the preferred implant is the intramedullary nail.  

Biomechanics and Deforming Forces 

The challenge of subtrochanteric fractures lies in the severe displacement caused by powerful regional musculature. A classic exam pearl dictates that the hallmark deformity is driven by the intact iliopsoas and abductors acting on the proximal fragment. To achieve a successful reduction before passing an intramedullary nail, surgeons must recognize and counteract these specific directional forces.  

The proximal fragment is predictably flexed by the iliopsoas muscle, abducted by the abductor muscles, and externally rotated by the external rotators. Conversely, the distal fragment is adducted by the adductors and significantly shortened by the pull of the quadriceps and hamstrings. Correcting this multi-planar deformity is the primary prerequisite for accurate intramedullary nail insertion.  

Biomechanical Deforming Forces in Subtrochanteric Fractures 

Bone Fragment Acting Muscle Groups Resulting Clinical Deformity 
Proximal Fragment Iliopsoas, Abductors, External Rotators  Flexed, Abducted, Externally Rotated  
Distal Fragment Adductors, Quadriceps, Hamstrings  Adducted, Shortened  

The Russell-Taylor Classification System 

Surgical decision-making, particularly regarding the entry point of the intramedullary nail, relies heavily on accurate classification. The standard for these injuries is the Russell-Taylor Classification, which is primarily based on the fracture’s extension into the piriformis fossa.  

Always assess the piriformis fossa first: if it is fractured, it is automatically a Type II injury. Type I fractures leave the piriformis fossa intact, while Type II fractures mean the fossa is involved.  

Differentiating Subtypes 

These main types are further subdivided based on the integrity of the lesser trochanter: 

  • Type IA and IIA: The lesser trochanter remains intact.  
  • Type IB and IIB: The lesser trochanter is fractured, which includes reverse oblique or oblique patterns.  

Treatment Principles: The Role of the Intramedullary Nail 

When managing a subtrochanteric fracture resulting from high-impact or high-velocity trauma, conservative treatment is generally not recommended. These injuries behave like femoral shaft injuries and require operative treatment.  

The intramedullary nail (such as the PFN or PFNA) stands as the gold standard and the absolute treatment of choice. Plate fixation (using a Proximal Femoral Locking Plate or an Angled Blade Plate) is considered an alternative only if the intramedullary nail entry point is highly compromised or unsuitable.  

Resident Focus Q&A: What is the most common surgical error encountered when inserting an intramedullary nail for a subtrochanteric fracture, and how is it corrected?  

The most common surgical error is utilizing an excessively lateral entry point, which causes severe varus malalignment and delayed union. If the intramedullary nail drifts laterally, the bailout technique is to use an Anterior-to-Posterior (AP) Poller (Blocking) screw to force the intramedullary nail medially.  

Surgical Techniques: Choosing the Right Entry Portal 

The success of an intramedullary nail heavily depends on selecting the safest and most mechanically sound starting point. 

The traditional piriformis fossa entry is technically demanding and carries a high risk of Avascular Necrosis (AVN) due to its proximity to the femoral head’s blood supply. It also carries a risk of an iatrogenic femoral neck fracture.  

Consequently, the Greater Trochanter (GT) Tip is the commonly preferred approach. By utilizing a modified medial trochanter portal, surgeons gain a mechanically protective trajectory that ensures better alignment, an easier intramedullary nail technique, and improved reduction. A common exam trap is confusing varus and valgus errors; remember that a lateral entry point for the intramedullary nail causes varus malalignment, not valgus.  

Intramedullary Nail Entry Portals and Associated Risks 

Intramedullary Nail Entry Portal Benefits Risks & Complications 
Piriformis Fossa Traditional alignment  High AVN risk, near blood supply, iatrogenic neck fracture  
Greater Trochanter (GT) Tip Preferred approach, avoids AVN risk  Requires a medial start to prevent varus deformity  
Lateral Entry (Surgical Error) None  Severe varus malalignment, nonunion, or delayed union  

Fixation Stability and Postoperative Rehabilitation 

When utilizing an intramedullary nail, the integrity of the lesser trochanter is the critical stability factor. For highly unstable fractures (like R-T Type 1B, 2A, 2B), the proximal locking strategy requires a Reconstruction (Recon) mode. This configuration uses 2 or 3 proximal screws driven into the femoral head to provide superior fixation and control of the proximal fragment.  

Postoperatively, the core principle is to avoid excessive force prematurely because the subtrochanteric region is subjected to massive bending moments. On Day 0, patients are restricted to touch-down weight bearing initially. Surgeons must wait a minimum of 6 weeks before allowing any advancement in weight-bearing, strictly relying on radiological evidence of callus formation.  

Frequently Asked Questions (FAQs) 

1. What defines the exact anatomical zone of a subtrochanteric fracture?  

It is the zone starting from the lesser trochanter and extending exactly 5 cm distal to it.  

2. What is the gold standard treatment for these injuries?  

Operative treatment using an intramedullary nail is the standard of care.  

3. In the Russell-Taylor classification, what dictates a Type II fracture?  

Any involvement or extension of the fracture into the piriformis fossa automatically classifies it as a Type II.  

4. What anatomical structure dictates the A vs. B sub-type in the Russell-Taylor system?  

The integrity of the lesser trochanter dictates the sub-type; Type A is intact, and Type B is fractured.  

5. Why is the Greater Trochanter tip preferred over the Piriformis Fossa for an intramedullary nail?  

The Greater Trochanter tip avoids the high risk of Avascular Necrosis (AVN) associated with the piriformis fossa entry.  

6. What is the consequence of an excessively lateral intramedullary nail entry point?  

A lateral entry point causes severe varus malalignment and frequently leads to nonunion or delayed union.  

7. How do you surgically correct a lateral drift of an intramedullary nail?  

Surgeons should place an Anterior-to-Posterior (AP) Poller (blocking) screw to force the intramedullary nail medially.  

8. What muscle forces cause the classic proximal fragment deformity?  

The proximal fragment is flexed by the iliopsoas, abducted by the abductors, and externally rotated by the external rotators.  

9. How many proximal screws are required for an intramedullary nail in Reconstruction (Recon) mode?  

Recon mode requires 2 or 3 proximal locking screws placed into the femoral head.  

10. When is the earliest a patient can advance beyond touch-down weight bearing after intramedullary nail fixation?  

Weight-bearing should never be advanced before a strict minimum of 6 weeks, and only after an X-ray confirms radiological callus formation. 

DocTutorials App Download Now

Latest Blogs

Understanding the Biomechanics of the Pelvic Ring and Pelvic Ring Fractures 

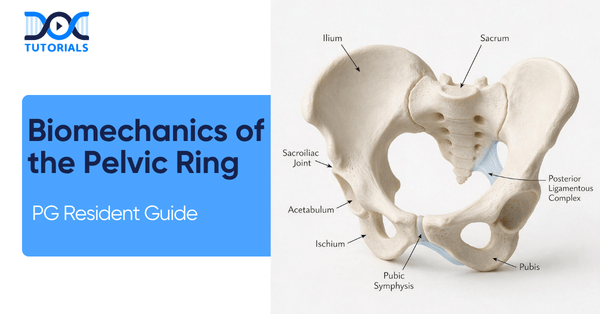
Biomechanics of the Pelvic Ring

For postgraduate orthopedic residents, mastering the intricate biomechanics of the pelvic ring is an absolute necessity. The structural integrity of this anatomical region dictates patient survival and long-term functional outcomes following severe, high-velocity trauma.  

When evaluating a pelvic ring fracture, one must immediately look beyond the broken bones and understand the profound, systemic failure of the soft-tissue envelope and ligamentous tension bands holding the pelvis together. This blog distills essential concepts regarding pelvic ring into actionable knowledge. 

Get High Quality, High Yield Orthopedics PG Residency Notes for Free! 

The Core Biomechanics of the Pelvic Ring 

The fundamental principle underlying the biomechanics of the pelvic ring is that its stability relies entirely on ligamentous integrity. The sacroiliac (SI) joint lacks any inherent bony stability of its own. Therefore, understanding the ligamentous anatomy is directly tied to understanding stability. 

When managing a pelvic ring fracture, residents must carefully distinguish between rotational support structures and vertical support structures. 

Rotational vs. Vertical Support Structures 

A critical clinical concept to remember is that a pelvis can be rotationally unstable yet remain vertically stable. 

If rotational stability fails during a trauma event, the anterior side and the anterior SI ligaments typically rupture. Conversely, if vertical stability fails, it is an indication that the posterior interosseous and iliolumbar ligaments have completely ruptured. 

Ligamentous Stabilizers of the Pelvic Ring 

Stability Type Key Anatomical Structures Involved 
Rotational Stability Symphysis ligaments  Sacrospinous ligament  Anterior sacroiliac ligament 
Vertical Stability Posterior sacroiliac ligament  Interosseous ligament  Iliolumbar ligament 

Acute Resuscitation in a Pelvic Ring Fracture 

A pelvic ring fracture typically results from high-velocity trauma, predominantly affecting younger patient populations. While most of these pelvic injuries are technically stable and non-surgical, catastrophic internal blood loss is the primary immediate threat to the patient’s life. 

The primary source of lethal hemorrhage in a pelvic ring fracture is the superior gluteal artery and its associated venous plexus, as well as the internal iliac artery. 

During acute trauma, the crisis metric to monitor is maximum blood loss, which can rapidly reach 1.5 to 2 liters. This volume of hemorrhage quickly leads to severe hypovolemic shock. 

How should a pelvic binder be correctly applied during the acute resuscitation phase of a pelvic ring fracture? 

A pelvic binder MUST be centered strictly over the greater trochanters, not the iliac crests, to effectively reduce the overall pelvic volume and provide mechanical tamponade. 

The Trauma Bay Algorithm 

When a patient arrives hemodynamically unstable with a suspected pelvic ring fracture, circumferential pelvic wrapping is the first step. 

Following this, a FAST exam dictates the next moves: if the FAST is positive (indicating intraperitoneal bleeding), the patient requires an immediate laparotomy. If the FAST is negative, the patient should proceed to angiography to embolize the bleeding vessels. The primary goal in the first 24 hours of treating a hemodynamically unstable patient is hemorrhage control, not anatomical bony reduction. 

Radiographic Signs and Classifications 

To properly assess the altered biomechanics of the pelvic ring post-trauma, a standard radiographic trauma series is required. This series includes the standard AP View, the Inlet View (taken at 40° Caudal), and the Outlet View (taken at 40° Cephalad). 

The Inlet view is utilized specifically to evaluate rotational displacement (front-to-back), whereas the Outlet view is essential for visualizing vertical displacement (up-and-down). 

Critical Instability Thresholds and Classifications 

Recognizing instability on an X-ray is paramount. For rotational instability, a symphysis diastasis (widening) of > 2.5 cm is the absolute clinical threshold that distinguishes a stable open-book injury (APC I) from an unstable one (APC II). For vertical instability, superior migration of one hemi-pelvis by 1.0 cm or more is the definitive sign. 

The Tile Classification System (AO/OTA 61) breaks down a pelvic ring fracture into three categories: 

  • Type A: Stable (Note: Type A3 fractures involving the transverse sacrum or coccyx are technically considered spinal injuries rather than true pelvic ring disruptions). 
  • Type B: Rotationally Unstable, Vertically Stable (e.g., Open Book, Lateral Compression). 
  • Type C: Rotationally & Vertically Unstable. 

Surgical Timing and Pelvic Ring Fracture Fixation 

When transitioning from the trauma bay to the OR, the physiological timing of the surgery is just as important as understanding the biomechanics of the pelvic ring. 

Surgical Timing Protocols for a Pelvic Ring Fracture 

Strategy Clinical Indicator (Venous Lactate) Protocol Summary 
EAC (Early Appropriate Care) < 4.0 mmol/L Proceed with definitive fixation within 36 hours. 
DCO (Damage Control Orthopedics) > 4.0 mmol/L Delay definitive fixation. Stabilize with external fixators, resuscitate in ICU until lactate drops. 

Operating for definitive fixation when a patient’s lactate is > 4.0 mmol/L significantly increases the mortality rate; DCO must be employed instead. 

Fixation Strategies and Clinical Pearls 

For anterior fixation, options include external fixation, Anterior Subcutaneous Internal Fixation (ASIF), and internal plating. However, because of continued physiological motion at the symphysis during healing, anterior plates will frequently break if posterior instability is not concurrently addressed. 

For posterior fixation, Denis Zone 2 sacral fractures mandate Open Reduction Internal Fixation (ORIF) over percutaneous techniques due to a 30% risk of neurological injury that requires decompression. Conversely, an open posterior approach has absolute contraindications: it should never be performed if the patient has a Morel-Lavallée lesion or recent internal iliac artery embolization, as it creates an extreme risk of catastrophic soft tissue failure. 

Frequently Asked Questions 

1. What is the primary stabilizing factor of the pelvic ring? 

The pelvic ring relies entirely on ligamentous integrity for its stability, as the sacroiliac joint lacks any inherent bony stability. 

2. Which ligaments fail if a pelvis becomes vertically unstable? 

If vertical stability fails, the posterior interosseous and iliolumbar ligaments have ruptured. 

3. What is the primary source of lethal hemorrhage in a pelvic ring fracture? 

The lethal hemorrhage source is typically the superior gluteal artery and venous plexus, or the internal iliac artery. 

4. Where exactly should a pelvic binder be placed? 

A pelvic binder must be centered strictly over the greater trochanters, rather than the iliac crests, to properly reduce pelvic volume. 

5. What does the Inlet radiographic view demonstrate? 

The Inlet view (taken at a 40° caudal angle) shows the inward or outward rotational displacement of the anterior pelvis. 

6. What symphysis widening measurement indicates an unstable open-book fracture? 

A symphysis diastasis of > 2.5 cm is the critical value that distinguishes a stable APC I from an unstable APC II injury. 

7. Why are Tile A3 fractures unique? 

Tile A3 fractures, which involve transverse fractures of the sacrum or coccyx, are technically classified as spinal injuries rather than true disruptions of the pelvic ring. 

8. What is the danger of a Denis Zone 2 sacral fracture? 

Denis Zone 2 (transforaminal) fractures carry a 30% risk of neurological compromise and mandate ORIF for neural decompression. 

9. When should Damage Control Orthopedics (DCO) be utilized over early fixation? 

DCO should be utilized when a patient’s venous lactate level is > 4.0 mmol/L or if they remain hemodynamically unstable. 

10. Why might an anterior pubic symphysis plate break post-operatively? 

Due to continued physiological motion at the symphysis during the healing process, anterior plates will frequently break if the associated posterior instability is not concurrently addressed surgically. 

DocTutorials App Download Now

Latest Blogs

Comprehensive Guide to Pediatric Tibia Fractures: Essential Concepts for PG Residents 

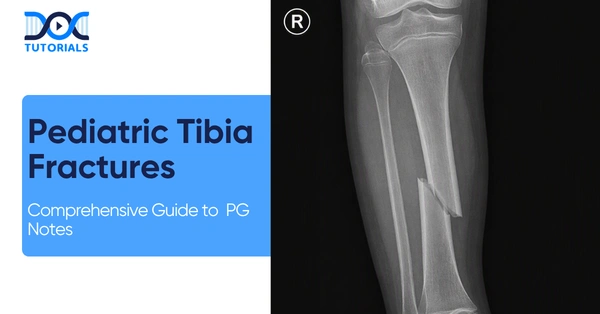
Pediatric Tibia Fractures

Pediatric tibia fractures represent a significant portion of long bone injuries encountered in pediatric orthopaedics. For PG residents, mastering the nuances of these fractures from identifying subtle toddler’s fractures to managing complex surgical indications is critical for both clinical practice and board examinations. This comprehensive guide provides an educational, factually accurate breakdown of pediatric tibia fractures, designed specifically to streamline your revision and decision-making processes. 

Get High Quality, High Yield Orthopedics PG Residency Notes for Free! 

Epidemiology and Demographics 

Understanding the demographic distribution of pediatric tibia fractures aids in swift clinical suspicion. These injuries are the third most common pediatric long bone fracture, trailing only behind the forearm and femur. They account for approximately 15% of all pediatric fractures. 

The peak incidence for these fractures occurs at 8 years of age, and they are twice as common in males. Specifically, 39% of these fractures occur in the middle third of the diaphysis, which is considered a high-risk zone. 

Exam Pearl: It is crucial to remember that the tibia is the second most commonly abused bone. Any pediatric tibia fracture requires a thorough evaluation to rule out child abuse. 

Osteology, Biomechanics, and Soft Tissue Vulnerabilities 

The osteology of the tibia plays a direct role in fracture healing and potential complications. The cross-sectional shape of the tibia is triangular. While there is thick cortical bone in the diaphysis, it transitions to a much thinner cortex distally. 

The anteromedial surface of the tibia is highly subcutaneous with an exposed anteromedial border. Both the middle and distal thirds feature notably poor muscular coverage. This specific vulnerability of the middle and distal thirds directly contributes to a higher risk of delayed union. 

Key Muscle Attachments and Vascular Anatomy 

Medially, the semimembranosus inserts on the inner tuberosity of the proximal medial tibia, while the sartorius, gracilis, and semitendinosus insert on the proximal medial metaphysis. Laterally, the tibialis anterior, extensor digitorum longus (EDL), and biceps femoris attach to the lateral tibial condyle, with the tensor fascia lata inserting on Gerdy’s tubercle. Injury to the proximal tibial physes or the tibial tubercle can cause a severe recurvatum deformity. 

The posterior tibial artery provides the main nutrient and periosteal supply. However, the anterior tibial artery is highly susceptible to injury at the interosseous membrane, particularly in proximally displaced metaphyseal fractures where the distal fragment translates. 

Fracture Patterns and Deformity Prediction 

The mechanism of injury directly dictates the resulting fracture pattern and predictable deformities in pediatric tibia fractures. 

  • Torsional Force: When the body rotates on a planted foot, it typically causes oblique or spiral fractures. 
  • Direct Trauma: This mechanism generally causes isolated transverse or comminuted fractures. 

Deformity prediction heavily relies on the status of the fibula. A transverse tibia fracture with an intact fibula is generally stable with minimal displacement. However, an intact fibula frequently drives a varus deformity due to the unopposed pull of the anterior compartment musculature. Conversely, a comminuted tibia with an intact fibula, or a fracture of both the tibia and fibula, often leads to a valgus deformity driven by the pull of the anterior and lateral compartments. 

What is the most critical early clinical indicator of impending compartment syndrome in a child presenting with pediatric tibia fractures?  

Pain on passive stretch of the toes is the most important early indicator of compartment syndrome, occurring long before neurological impairment or pulselessness. 

Clinical Assessment and The Toddler’s Fracture 

Initial clinical assessment must be rigorous. Always assume an open fracture until proven otherwise, and ensure capillary refill is less than 3 seconds. Immediate neurological impairment is rare, making the monitoring of toe pain response crucial. 

For imaging, AP and Lateral plain radiographs must include both the knee and ankle joints. A CT scan is useful for subtle fractures, oblique patterns, or intra-articular extension, while an MRI is reserved for identifying neoplasms or soft tissue injury. 

The Elusive Toddler’s Fracture 

A specific subset of pediatric tibia fractures is the Toddler’s fracture. The clinical presentation includes a refusal to bear weight coupled with localized tenderness. A negative initial X-ray does not rule out this diagnosis; if clinical signs are present, it should be treated as a tibial fracture with an intact fibula. Management involves a cast for 6 weeks with repeat X-rays every 2-3 weeks. 

Non-Operative Management and Cast Wedging 

Conservative management of pediatric tibia fractures follows a specific casting sequence. Phase 1 utilizes a Long Leg Slab for 5 days to allow initial swelling to subside. Phase 2 involves a Long Leg Cast for 4-6 weeks for primary stabilization. Phase 3 transitions to a Short Leg Cast (PTB/Sarmiento) for an additional 4-6 weeks to permit weight-bearing. The total duration can be up to 12 weeks in adolescents. 

Beware of “Fracture Drift,” where muscle atrophy and decreased swelling cause a loss of reduction inside the cast, necessitating re-manipulation under sedation. 

If malalignment occurs, cast wedging may be indicated. Always perform an open wedge rather than a closed wedge to prevent shortening and skin necrosis. The golden rule of thumb is: 1 cm of wedging equals 10° of angular correction. 

Acceptable Reduction Criteria 

Strict radiographic parameters must be met to avoid surgery, similar to the rigid standards outlined in resources like pediatric tibia fractures orthobullets. Age 8 is the critical watershed year defining whether a pediatric tibia will remodel adequately. 

Acceptable Reduction Criteria Thresholds 

Deformity Parameter Age < 8 years Age > 8 years 
Valgus Angulation < 5 degrees < 5 degrees 
Anterior Angulation < 10 degrees < 5 degrees 
Posterior Angulation < 2 degrees < 5 degrees 
Shortening Around 4 mm Around 10 mm 
Rotation < 5 degrees < 5 degrees  

Note: Rotational deformity does not remodel spontaneously; less than 5 degrees is the absolute maximum accepted at any age. 

Surgical Indications and Operative Methods 

When conservative management of pediatric tibia fractures fails, surgical intervention is required. While studying pediatric tibia fractures orthobullets can provide broad overviews, the specific surgical indications are highly tested. 

Surgical Indications 

Absolute Indications Relative Indications 
Inability to attain/maintain reduction in cast Significant soft tissue injury 
Open fractures Floating knee injuries 
Severe swelling or acute impending compartment syndrome Large or obese child 
Polytrauma  
Segmental fractures  

Fixation Methods 

  • External Fixation: Used for open fractures with extensive soft tissue injury, length-unstable fractures, and polytrauma. Thermal necrosis during drilling is the primary preventable cause of early pin loosening. 
  • TENS (Flexible Nails): Indicated for closed/unstable fractures in children <10 years old or <50 kg. They are contraindicated in older/heavier children due to a lack of rotational and length stability. 
  • Rigid IM Nail: Used at or near skeletal maturity, but contraindicated with an open physis due to the risk of limb length discrepancy (LLD) or recurvatum. 
  • Plate Osteosynthesis: Ideal for nonunion, intra-articular extension, or open fractures. 

Late Complications: Nonunion and Malunion 

Late failures in pediatric tibia fractures require specific salvage procedures. For delayed union, a 1 cm partial fibulectomy is performed to dynamically increase axial compression at the tibial fracture site during weight-bearing. 

For malunions, remember that axial deformities may correct spontaneously, but a rotational malunion will NEVER correct, invariably necessitating a surgical derotation osteotomy. 

Frequently Asked Questions (FAQs) 

1. What is the peak incidence age for pediatric tibia fractures?  

The peak incidence is 8 years of age. 

2. What is the most important early indicator of compartment syndrome?  

Severe pain on passive stretch of the toes. 

3. What is the cast wedging ratio for angular correction?  

Exactly 1 cm of wedging provides 10° of angular correction. 

4. When are flexible intramedullary nails (TENS) contraindicated?  

They are contraindicated in children >10 years of age or weighing >50 kg due to insufficient rotational and length stability. 

5. What causes a varus deformity in a tibial fracture?  

An intact fibula drives a varus deformity due to the unopposed pull of the anterior compartment musculature. 

6. How is delayed union of the tibia surgically managed?  

It is treated with a 1 cm partial fibulectomy to restore axial compression. 

7. Does a rotational deformity remodel spontaneously in children?  

No, rotational deformity never corrects spontaneously, and less than 5 degrees is the maximum accepted tolerance. 

8. What is the second most commonly abused bone in children?  

The tibia; therefore, any tibial fracture in a child requires ruling out child abuse. 

9. What is the classic clinical presentation of a Toddler’s fracture?  

A refusal to bear weight combined with localized tenderness. 

10. Why should you avoid closed cast wedging?  

Closed cast wedging should be avoided because it causes bone shortening and risks skin necrosis. 

DocTutorials App Download Now

Latest Blogs

Hangman’s Fracture: A Comprehensive Guide for PG Residents 

Hangmans Fracture

Welcome to this in-depth, high-yield rapid revision guide on Hangman’s Fracture. Tailored explicitly for Orthopaedic PG residents, this blog distills essential concepts regarding cervical spine trauma into actionable knowledge. From deciphering nuanced radiological landmarks to navigating complex surgical decision-making matrices, this guide provides the foundational and advanced insights necessary for both clinical excellence and board exam preparation. 

Get High Quality, High Yield Orthopedics PG Residency Notes for Free! 

Definition and Pathoanatomy 

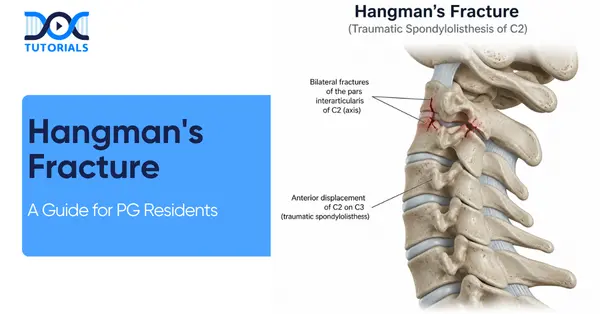
Hangman’s Fracture is defined strictly as a traumatic spondylolisthesis of the C2 vertebra over the C3 vertebra. The term itself is derived from the Greek words “spondylos” meaning vertebra, and “listhesis” meaning slip.  

In orthopaedic pathology, this injury is synonymous with the traumatic disruption of the C2 vertebra originating specifically from the pars interarticularis. It is crucial to remember that the primary anatomical failure point defining this specific injury pattern is the bilateral C2 pars interarticularis.  

While the nomenclature carries a historical weight—coined and originally described by Horton—the term is clinically a misnomer in modern traumatology. Today, traumatic spondylolisthesis is most commonly caused by road traffic accidents (RTAs), rather than judicial hanging.  

Radiological Landmarks for Diagnosis 

Initial assessment of a suspected Hangman’s Fracture heavily relies on precise imaging. The lateral cervical spine X-ray serves as the primary and most vital diagnostic modality for the initial evaluation of this injury.  

Understanding normal cervical anatomy is a prerequisite for identifying pathology. In a normal lateral radiograph, the anterior margin of most vertebral bodies aligns perfectly in a straight vertical line.  

When analyzing Hangman’s pathology, the physician must look for the disruption of this anterior vertebral line precisely at the C2-C3 junction. The affected C2 vertebra demonstrates noticeable anterior translation, which visually confirms the spondylolisthesis. Loss of this straight anterior vertebral body line at C2 is considered the hallmark radiological sign of spondylolisthesis.  

The Levin & Edwards Classification System 

To properly manage these injuries, PG residents must rely on established classification systems. Just as you might study the Seinsheimer classification of subtrochanteric fractures to master complex lower limb trauma, thoroughly understanding the Levin & Edwards classification is non-negotiable for navigating Hangman’s Fracture scenarios. 

The primary factor differentiating stable from unstable injury patterns in this classification is a critical threshold of 3mm of displacement.  

Stable and Minimally Displaced Injuries 

Type I injuries involve angulation or translation primarily driven by extension forces. In these cases, there is a substantial injury to the C2-C3 interspace, but the structural alignment remains relatively stable, presenting with less than 3mm of displacement.  

Unstable and Highly Displaced Injuries 

Type II injuries are categorized by more than 3mm of displacement. These fractures present with significant anteroposterior (AP) and angular deviation caused by flexion. Type II is considered an unstable injury and frequently requires surgical intervention.  

The Star & Eismont Modification 

The Star & Eismont modification introduces the Type IA category, which falls within Type I injuries due to having less than 3mm of displacement. However, a portion of the posterior C2 body remains in physical continuity with a pars fracture fragment.  

This specific anatomical arrangement is highly dangerous. The posterior fragment can directly compress the spinal canal. Despite minimal translation, Type IA injuries carry a highly elevated incidence of neurological deficit.  

Why is the Type IA Hangman’s Fracture often referred to as a “wolf in sheep’s clothing”?  

Type IA is considered a “wolf in sheep’s clothing” because, on standard imaging, it presents with minimal displacement (less than 3mm), mimicking a benign Type I injury. However, because a portion of the posterior C2 body remains in continuity with the fractured pars fragment, it directly compresses the spinal canal, carrying a deceptively high risk of spinal cord compression and severe neurological deficit.  

Classification Breakdown Matrix 

Classification Type Displacement / Features Stability & Mechanism Key Clinical Note 
Type I < 3mm displacement  Extension injury; relatively stable  Substantial injury to C2-C3 interspace  
Type IA < 3mm displacement  High risk of canal compression  Portion of posterior C2 body remains continuous with pars fragment  
Type II > 3mm displacement  Flexion injury; considered unstable  Significant AP and angular deviation  
Type IIA No anterior translation  Horizontal/oblique fracture line  Significant angular deviation; highly unstable  
Type III C2 pars fracture + facet dislocation  Extreme instability  Requires operative stabilization  

Non-Operative Management Principles 

Conservative, non-operative management is the preferred route exclusively when a thorough assessment confirms the absence of neurological compromise or deficit. Stable Hangman’s Fracture patterns rarely present with neurological deficits, making conservative treatment the standard protocol for the majority of non-displaced cases.  

Before committing a patient to a 6-8 week cervical collar regimen, clinicians must always rule out concomitant cervical spine injuries and hidden neurological deficits.  

For Type I and Type IA injuries, application of a rigid cervical collar for 6 to 8 weeks is standard, provided no other injuries exist. For Type II fractures, the management protocol dictates initial reduction via traction, which is subsequently followed by halo brace immobilization.  

The Critical “No Traction” Rule 

Traction must be applied with extreme caution and is strictly contraindicated in Type IIA fractures. Applying traction to a Type IIA fracture actively worsens the injury, increasing the deformity and potentially causing catastrophic iatrogenic spinal cord injury and further neurological compromise.  

Because Type IIA fractures are highly unstable due to their oblique or horizontal fracture lines, reduction must be achieved exclusively through extension and compression maneuvers using a halo apparatus.  

Operative Management and Indications 

When conservative measures fail or extreme instability is present at diagnosis, surgery becomes necessary. A failure of Halo immobilization—such as a loss of reduction or the development of non-union—in Types II and IIA immediately upgrades the management directly to surgical fusion.  

Type III injuries serve as an absolute indication for surgery. Type III cannot be managed conservatively because they always present with facet dislocation. Surgery is the singular indication for Type III fractures due to these dislocated facets and the severe lack of continuity between the C2 articular processes and the main C2 vertebral body.  

The standard operative intervention for unstable Hangman’s Fracture cases is a posterior C1-C3 fusion utilizing pedicular screws. Anterior reduction maneuvers are notably difficult in Type III scenarios because the articular process is completely disconnected from the C2 body.  

Surgical Approaches Comparison Matrix 

Approach Stabilization Levels Advantages Disadvantages Indications 
Anterior Fusion C2-C3  Preserves C1-C2 motion (maintains lateral rotation)  Less rigid/strong than posterior lateral mass fixation  Indicated for Type II or IIA if non-operative treatment fails  
Posterior Fusion C1-C3  Strongest construct for total stabilization  Sacrifices atlantoaxial mobility (permanently locks lateral neck rotation)  Ideal for Type III; preferred when anterior reduction is impossible  

Frequently Asked Questions (FAQs) 

1. What is the most common cause of a Hangman’s Fracture today?  

Despite its name, road traffic accidents (RTAs) vastly outnumber judicial hanging as the primary cause of this fracture in modern practice.  

2. What anatomical structure is primarily fractured in this injury?  

The hallmark failure point is the bilateral C2 pars interarticularis.  

3. What is the primary imaging modality for diagnosing this fracture?  

The lateral cervical spine X-ray is the primary modality used for initial assessment.  

4. What radiological sign confirms the diagnosis?  

The loss of the straight anterior vertebral body line at C2, demonstrating anterior translation, is the hallmark sign.  

5. What is the displacement threshold between Type I and Type II fractures?  

The critical threshold differentiating these fracture types is 3mm of displacement.  

6. Why is traction strictly contraindicated in Type IIA fractures? Traction increases deformity in the oblique/horizontal fracture lines of Type IIA, risking catastrophic iatrogenic spinal cord injury.  

7. How should a Type IIA Hangman’s Fracture be reduced?  

Reduction for Type IIA must be achieved by applying extension and compression via a halo apparatus.  

8. What defines a Type III Hangman’s Fracture?  

Type III is exclusively defined by any C2 pars fracture combined with a dislocation of the C2-C3 facet joint.  

9. Can a Type III fracture be managed conservatively?  

No, Type III cannot be managed conservatively; the presence of facet dislocation means surgery is the only indication.  

10. What is the primary disadvantage of a Posterior C1-C3 fusion?  

While providing maximum stability, it permanently eliminates lateral neck rotation by locking the atlantoaxial joint. 

DocTutorials App Download Now

Latest Blogs

Mastering External Fixation Principles for Subtrochanteric Fractures: A High-Yield Guide for PG Residents 

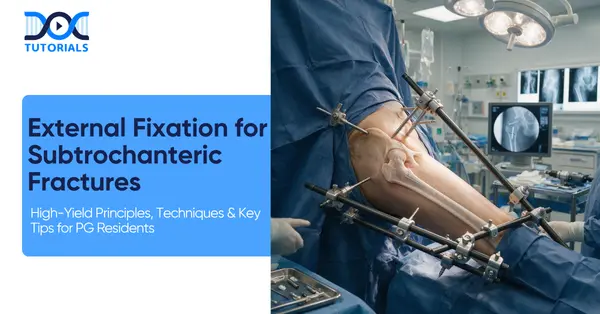
External Fixation for Subtrochanteric Fractures

In orthopedic trauma, managing severe lower extremity injuries requires a strong grasp of biomechanics and soft tissue biology. For postgraduate residents preparing for board exams and surgical practice, applying sound external fixation principles to complex injuries like subtrochanteric fractures is essential. This guide synthesizes key concepts, pin biomechanics, surgical steps, and complication management into a high-yield revision resource.  

Get High Quality, High Yield Orthopedics PG Residency Notes for Free! 

Indications and Biomechanical Foundations

While intramedullary nailing remains standard for closed femoral shaft injuries, applying external fixation principles is critical when handling open wounds, soft tissue compromise, or polytrauma.  

Primary Indications and Contraindications 

  • Open Fractures: External frames bypass contaminated soft tissue envelopes, placing hardware away from the injury zone to reduce hardware infection risks.  
  • Polytrauma & Damage Control Orthopedics (DCO): In unstable patients requiring life-saving stabilization, provisional fixation must be applied rapidly—ideally within 15–20 minutes.  
  • Specialty Uses: Include compression mode for pelvic shock hemorrhage, delta frames, and Ilizarov ring constructs for deformity correction, bone transport, and infected non-unions.  
  • Relative Contraindications: Patient non-compliance and morbid obesity (170–200 kg), where deep adipose tissue obscures bony landmarks and makes Shanz pin placement difficult.  

Management Workflow: Open Fractures / Polytrauma Radical Debridement -> External Fixation (2 cm Gap, Safe Zones) -> Pin Tract Monitoring -> 2-3 Weeks Later: Convert to Internal Fixation

Construct Biomechanics and Pin Rules 

Construct stability relies on strict biomechanical rules. When stabilizing high-load areas seen in subtrochanteric fractures, understanding frame dynamics prevents mechanical failure.  

The Laws of Rigidity and Pin Placement 

  1. Stiffness: Rigidity scales with the fourth power of the pin radius. Doubling pin thickness increases construct rigidity by 16 times (16x).  
  1. The Rule of Thirds: Maximum pin diameter must never exceed 1/3 of the bone shaft diameter. Exceeding this creates a severe stress-riser, increasing refracture risk upon removal.  
  1. Pin Proximity and Span: Pins should be placed close to the fracture line (outside the contaminated zone) while maximizing the distance (span) between pins within the same fragment.  
  1. Soft Tissue Gap: Always maintain an exact 2 cm gap between the rod and skin to accommodate post-traumatic edema.  
  1. Rod Material: Carbon fiber rods offer higher rigidity and radiolucency for postoperative imaging.  

Pin Selection and Material Properties 

Pin Type / Material Design Features Clinical Application & Indications 
Schanz Pin Partially threaded tip  Standard half-pin for trauma frame constructs  
Steinmann Pin Smooth shaft  Skeletal traction and delta frame constructs  
Conical Pin Self-drilling tapering threads  Limb Reconstruction Systems (LRS)  
Stainless Steel Standard stiffness  Standard, widely available material  
Titanium Lower modulus of elasticity  Matches bone stress-strain index; reduces stress shielding & infection  
Hydroxyapatite (HA) Bioactive coating  Superior osteo-integration; ideal for osteoporotic or malignant bone  

Insertion Biomechanics: Pre-Drilled vs. Self-Drilling Pins 

  • Pre-Drilled Pins: Require a pilot hole drilled under continuous cold saline irrigation. This minimizes peak insertion temperatures, prevents thermal necrosis, and reduces risk of premature pin loosening. This is the mandatory choice for definitive fixation.  
  • Self-Drilling Pins: Faster to insert but generate high frictional heat, causing thermal necrosis, cortical micro-fractures, and lower pull-out strength. Strictly reserved for emergency DCO or pelvic fixation.  

Why are self-drilling pins contraindicated for long-term external fixation in subtrochanteric fractures? 

Self-drilling pins generate high frictional heat during insertion without a pilot hole, causing thermal necrosis of the surrounding cortical bone. This leads to micro-fractures, reduced pull-out strength, and premature pin loosening. For long-term fixation or bridging of subtrochanteric fractures, pre-drilling with continuous cold saline irrigation is mandatory to preserve bone viability.  

Anatomical Safe Zones and Technical Execution 

Surgica precision during pin insertion protects neurovascular structures. When managing subtrochanteric fractures, pins m l ust follow safe corridors in the proximal femur.  

Regional Anatomical Safe Zones 

  • Femur: Anterolateral or direct lateral entry (through vastus lateralis).  
  • Humerus: Proximal anterolateral; distal posterolateral (specifically avoiding the olecranon fossa).  
  • Forearm: Ulna along its subcutaneous border; radius directly dorsal (dorsolateral insertion risks injury to the superficial radial nerve).  
  • Tibia: Subcutaneous anteromedial border, perpendicular to the cortex.  

Step-by-Step Application Protocol 

  1. Debridement: Radical wound debridement and thorough wash. Remember the rule: “Dead bone is not buried”—all devitalized bone fragments must be removed to prevent sequestrum formation.  
  1. Reduction: Achieve provisional reduction of length, alignment, and rotation.  
  1. Incision: Make a 1 cm skin incision centered in the safe zone.  
  1. Dissection: Bluntly dissect down to bone using artery forceps, then insert a tissue protection sleeve.  
  1. Drilling: Drill a pilot hole using continuous cold saline irrigation.  
  1. Insertion: Hand-insert Schanz pins using a manual T-handle (typically 3 proximal and 3 distal).  
  1. Assembly: Connect pins to carbon fiber rods via clamps, re-verify fracture reduction, and perform final tightening.  

Technical Application Pitfalls 

  • Proud Pins: Leaving pins excessively long beyond the far cortex in the femur risks lacerating the femoral artery or causing a pseudoaneurysm. Pass only 1–2 thread turns beyond the far cortex.  
  • Eccentric Pin Placement: Trapping skin under tension causes skin strangulation and pin-site breakdown. If skin binding occurs, immediately extend the incision to relieve tension.  

Pin Site Care, Infection Classification, and Conversion Staging 

Postoperative vigilance prevents pin-tract infections, which are the single most common complication of external fixation.  

Pin Care Best Practices 

Daily care requires strict hand hygiene, sterile gloves, and saline swab cleaning moving upward from the skin. Dried exudate must be aggressively removed because it serves as a nidus for bacterial growth, rather than a protective scab.  

Pin-Tract Infection Classification (Checketts-Otterburn) and Protocols 

Grade Clinical Appearance Recommended Management Protocol 
1 Slight erythema, minimal discharge  Intensify local pin care protocol  
2 Erythema, purulent discharge, soft tissue pain  Oral or topical antibiotics + improved pin care  
3 Grade 2 presentation failing antibiotic therapy  Remove affected pin; change antibiotic regimen  
4 Soft tissue infection involving multiple pins  Remove loose pins; systemic antibiotics  
5 Grade 4 with radiographic bone involvement (ring sequestrum)  Remove entire fixator construct + formal pin-tract curettage  
6 Persistent infection post-fixator removal  Operative debridement, irrigation, systemic antibiotics  

Conversion to Internal Fixation 

External fixators serve as temporary bridges (typically 2 to 3 weeks) until soft tissue edema resolves.  

  • Clean Pin Sites: If pin sites show no signs of infection, proceed directly to single-stage internal fixation (e.g., intramedullary nailing).  
  • Infected Pin Sites (Grades 2–5): Direct conversion is contraindicated due to the risk of intramedullary canal contamination. A two-stage protocol is required:  
  • Stage 1: Remove external fixator, perform radical pin-tract debridement, and place patient on targeted systemic antibiotics.  
  • Stage 2: Perform definitive internal fixation only after infection has fully cleared.  

Frequently Asked Questions (FAQs) 

1. What is the maximum safe pin diameter relative to bone shaft size? 

Pin diameter must not exceed 1/3 of the bone shaft diameter to avoid creating a severe stress-riser and subsequent refracture.  

2. How much does doubling a pin’s diameter increase frame stiffness? 

Because stiffness scales with radius to the fourth power (R4), doubling pin diameter increases construct stiffness by 16 times (16x).  

3. Why is pre-drilling preferred over self-drilling pins for definitive fixation? 

Pre-drilling with continuous cold saline irrigation minimizes insertion heat, preventing thermal necrosis, micro-fractures, and premature loosening.  

4. What distance should be maintained between the fixator rod and the skin? 

Maintain an exact 2 cm gap to allow sufficient room for postoperative soft tissue edema.  

5. What is the target timeframe for damage control external fixation in polytrauma? 

Provisional damage control frames should be applied rapidly within 15 to 20 minutes.  

6. What anatomical safe corridor is used for femoral pin placement? 

Pins are placed along the anterolateral or direct lateral aspect of the femur through the vastus lateralis.  

7. What is the danger of leaving pins “proud” past the far cortex in the femur? 

A proud pin protruding excessively past the medullary canal risks lacerating the femoral artery or creating a pseudoaneurysm.  

8. Should dried exudate around pin sites be left intact as a biological barrier? 

No. Dried exudate must be meticulously removed during daily pin care because it acts as a nidus for infection.  

9. What finding in Grade 5 pin-tract infection mandates construct removal? 

Radiographic evidence of bone involvement (such as a ring sequestrum) mandates complete removal of the frame and pin-tract curettage.  

10. How should an infected external fixator be converted to internal fixation? 

It requires a two-stage protocol: first remove the fixator and debride pin tracts under antibiotic coverage, then perform internal fixation once infection resolves. 

DocTutorials App Download Now

Latest Blogs

Mastering the Brachial Plexus: Anatomy, Classifications, and Injury Management 

Brachial Plexus Injuries

Mastering the intricate network of the brachial plexus is non-negotiable for clinical and examination success. This guide breaks down the essential anatomy, common exam traps, and the most vital diagnostic parameters surrounding a brachial plexus injury.  

Get High Quality, High Yield PG Residency Orthopedics Notes for Free! 

The Architectural Foundation of the Brachial Plexus 

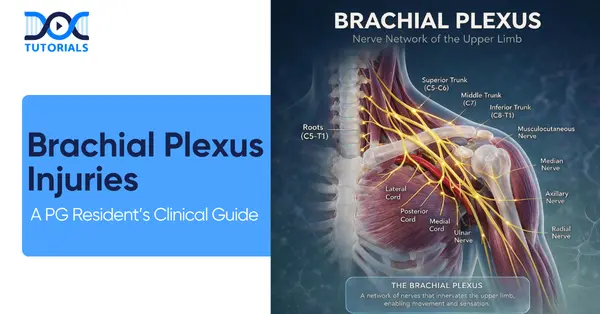
The biological wiring diagram of the brachial plexus follows a highly specific and logical sequence of formation. The sequence flows from Roots to Trunks to Divisions to Cords to Branches. Understanding this anatomical sequence is the first step in diagnosing and mapping any brachial plexus injury.  

Roots, Trunks, and Divisions 

The network originates from the ventral rami of spinal nerves C5, C6, C7, C8, and T1. These nerve roots quickly merge to form three distinct trunks.  

  • The Upper Trunk is formed by the union of the C5 and C6 roots.  
  • The Middle Trunk is formed exclusively by the continuation of the C7 root.  
  • The Lower Trunk is formed by the union of the C8 and T1 roots.  

Once the trunks are formed, they traverse towards the clavicle and each splits into anterior and posterior divisions. This division step is crucial because it reorganizes the nerve fibers to eventually supply the anterior (flexor) and posterior (extensor) compartments of the upper extremity.  

Cords and Terminal Branches 

Following the divisions, the nerves reorganize into three cords. The cords of the brachial plexus utilize a strict nomenclature that is based entirely on their anatomical relationship to the axillary artery.  

  • The Lateral Cord is formed by the anterior divisions of the Upper and Middle trunks.  
  • The Medial Cord is formed solely by the anterior division of the Lower trunk.  
  • The Posterior Cord is uniquely formed by the posterior divisions from all three trunks (Upper, Middle, and Lower).  

Mastering this RTDCB (Roots, Trunks, Divisions, Cords, Branches) sequence and the specific cord relations to the axillary artery will allow you to localize lesions perfectly in clinical practice.  

Do all segments and connections within the brachial plexus give off peripheral nerve branches? 

Answer: No. A defining anatomical rule of the brachial plexus is that divisions give off absolutely no branches. Assuming that all parts of the plexus give off branches is a very common exam trap designed to test your foundational anatomical knowledge.  

Specific Nerve Branches and Clinical Correlates 

The brachial plexus gives rise to multiple nerves, each with distinct motor and sensory responsibilities. Recognizing the function of these nerves helps quickly identify the level of a brachial plexus injury. 

Root and Trunk Level Branches 

Several nerves branch off before the formation of the cords. 

  • The Dorsal Scapular nerve and a contribution to the Phrenic nerve branch directly from the C5 root.  
  • The Long Thoracic nerve, which provides motor supply to the serratus anterior, originates from roots C5, C6, and C7.  
  • The Superior Trunk gives off the Suprascapular nerve and the Nerve to the subclavius.  

A lone C5 root injury can drastically compromise respiratory function due to its critical contribution to the phrenic nerve and neck muscles. Furthermore, a brachial plexus injury to the upper roots (C5-C6) results in Erb’s palsy, while an injury to the lower roots (C8-T1) results in Klumpke’s palsy.  

Cord Level Terminal Branches 

The lateral, medial, and posterior cords give rise to the major terminal branches of the upper limb. 

  • The Lateral Cord branches into the Lateral Pectoral nerve (supplying the Pectoralis major), the Musculocutaneous nerve (supplying the Biceps, Brachialis, and Coracobrachialis), and the Lateral root of the Median nerve.  
  • The Medial Cord branches into the Medial Pectoral nerve, Medial Cutaneous nerves, the Ulnar nerve, and the Medial root of the Median nerve.  
  • The Posterior Cord gives rise to the Superior and Inferior Subscapular nerves, the Thoracodorsal nerve, the Axillary nerve, and the Radial nerve.  

The Radial nerve is solely responsible for all extension mechanisms of the upper limb, including elbow, wrist, and digit extension. When evaluating hand innervation, be aware of ulnar motor exceptions: the thenar muscles and the lateral two lumbricals are median-innervated, not ulnar-innervated.  

Mechanisms and Patterns of a Brachial Plexus Injury 

When evaluating a patient with a brachial plexus injury, identifying the mechanism of trauma helps narrow down the damaged anatomy. Approximately 50% of these plexus injuries are caused by traction, which is predominantly seen in motor vehicle accidents (MVAs).  

Common Etiologies and Vascular Associations 

The anatomical location of the trauma often correlates strongly with specific vascular injuries. Distinguishing between supraclavicular and infraclavicular injury patterns clinically is a necessary skill for PG residents. Identifying the associated vascular injury will expertly help you localize the exact level of the brachial plexus injury.  

Injury Location Anatomical Region Mechanism of Injury Associated Vascular Injury 
Supraclavicular Located above the clavicle  The neck and shoulder are violently forced apart  Subclavian artery  
Infraclavicular Located below the clavicle  Fractures or dislocations occurring around the shoulder joint  Axillary artery  

Nerve Microanatomy and Injury Classifications 

To fully grasp the severity and prognosis of a brachial plexus injury, you must understand the microscopic layers of peripheral nerves. The severity of a nerve injury depends entirely on the depth of connective sheath disruption.  

The Layers of a Peripheral Nerve 

The nerve is composed of several protective layers surrounding the functional core. 

  • Epineurium: This is the outermost nerve covering.  
  • Perineurium: This layer covers individual fascicles, or bundles of axons.  
  • Endoneurium: This innermost connective layer covers individual axons.  
  • Axon: This is the functional unit capable of regeneration.  

Overall prognosis is inversely proportional to connective tissue sheath involvement. Intact connective sheaths are critically required for directed axonal regeneration. Therefore, a lone axonal injury where the sheaths remain intact always carries a more favorable prognosis compared to covering-sheath disruptions.  

Seddon and Sunderland Systems 

Accurate grading of the injury using the Sunderland system is the most critical principle in clinical management, as it directly dictates the binary choice between clinical observation and surgical intervention.  

Sunderland Type Seddon Equivalent Histopathologic Changes Recovery Potential 
Type I Neurapraxia  Myelin injury only (physiological conduction block)  Spontaneous auto-recovery within days to weeks  
Type II Axonotmesis  Axonal injury with an intact endoneurium  Auto-recovery expected due to intact sheath  
Type III Axonotmesis  Axonal and endoneurial injury  Spontaneous auto-recovery is still possible  
Type IV Neurotmesis (Mixed)  Perineurial injury and fascicular disruption  No spontaneous recovery; requires surgical repair  
Type V Neurotmesis  Complete nerve transection and epineurial disruption  No spontaneous recovery; requires surgical repair  

A common exam trap is equating Sunderland Type III with a guaranteed failure of recovery; however, spontaneous auto-recovery is still possible in Type III injuries because the axon remains capable of regeneration despite endoneurial damage. Sunderland Type IV is the critical threshold where spontaneous recovery becomes impossible due to perineurial disruption. The worst possible scenario is a complete root avulsion from the spinal origin, which represents the most severe, irreparable form of a primary brachial plexus injury.  

Clinical Assessment and Prognosis 

In managing a brachial plexus injury, the Tinel sign is your primary clinical monitor for tracking axonal regeneration.  

The presence of a progressing Tinel sign fundamentally rules out Neurapraxia (Sunderland Type I), because Neurapraxia does not feature Wallerian degeneration. It also rules out complete Neurotmesis (Sunderland Type V/VI), where regeneration cannot naturally cross the transection.  

  • If a Tinel sign is progressing distally, axonal regeneration is actively occurring, and the resident should continue to observe the patient.  
  • If the Tinel sign is absent or stops progressing, you must reassess for stalled recovery or immediately plan for surgical repair.  

Frequently Asked Questions (FAQs) 

  1. What specific nerve roots form the brachial plexus?  

The ventral rami origins of the brachial plexus are C5, C6, C7, C8, and T1.  

  1. Which roots are involved in Erb’s palsy?  

Erb’s palsy is an upper root brachial plexus injury that involves the C5 and C6 roots.  

  1. Which roots are involved in Klumpke’s palsy?  

Klumpke’s palsy is a lower root brachial plexus injury that involves the C8 and T1 roots.  

  1. What is the motor function of the long thoracic nerve?  

The long thoracic nerve, derived from roots C5, C6, and C7, supplies motor function to the serratus anterior muscle.  

  1. How can a lone C5 root injury affect respiration?  

A lone C5 root brachial plexus injury can compromise respiratory function due to its critical contribution to the phrenic nerve.  

  1. Does the ulnar nerve innervate all intrinsic hand muscles?  

No, always check the exceptions for ulnar nerve hand supply: the thenar muscles and lateral two lumbricals are spared, as they are median-innervated.  

  1. What is the primary function of the radial nerve?  

The radial nerve is solely responsible for all extension mechanisms of the upper limb, including elbow, wrist, and digit extension.  

  1. What characterizes Neurapraxia?  

Neurapraxia is a physiological conduction block involving myelin injury only, with the axon perfectly intact, allowing spontaneous recovery within days to weeks.  

  1. What defines Axonotmesis?  

Axonotmesis features axonal injury while the nerve sheath remains intact, and it always presents with Wallerian degeneration distal to the site of the brachial plexus injury.  

  1. What is the clinical significance of a progressing Tinel sign?  

A progressing Tinel sign fundamentally indicates that axonal regeneration is occurring in Sunderland Types II and III injuries, and it effectively rules out Neurapraxia and complete Neurotmesis. 

DocTutorials App Download Now

Latest Blogs

High-Yield Nephrology: Mastering ABG and AKI for PG Residents 

Essential Nephrology Smart Notes for PG Residents

Welcome to this essential guide on Nephrology, tailored specifically for postgraduate (PG) residents seeking to master complex clinical scenarios. Nephrology demands a profound understanding of physiology, intricate acid-base balances, and precise diagnostic criteria to ensure optimal patient outcomes.  

This comprehensive review breaks down crucial Nephrology concepts, ranging from the reliability of Arterial Blood Gas (ABG) analysis to the nuances of Acute Kidney Injury (AKI) management. 

Get High Quality, High Yield Nephrology PG Residency Notes for Free! 

Systematizing Arterial Blood Gas (ABG) in Nephrology 

The cornerstone of acute Nephrology is the accurate interpretation of the Arterial Blood Gas (ABG) profile. Every Nephrology resident must approach this systematically to avoid critical errors in diagnosis. 

Step 0: Clinical Context and Reliability 

Before analyzing values, establishing the clinical context is paramount. This includes noting the patient’s ID, location, age, ventilator settings (FIO2, PEEP), and oxygen support in liters per minute. 

Crucially, you must perform a reliability check using the Henderson-Hasselbalch relationship. Because pH, bicarbonate, and pCO2 are chemically locked, independent errors make the result impossible. The validation formula is: 

([H+] × [HCO3-]) / pCO2 = 24 ± 2 

This requires estimating [H+] based on pH. If the result is within 24 ± 2, the sample is valid, and you can proceed to analysis; otherwise, the result is unreliable, and you must repeat the sample. 

Step 1: Oxygenation Status 

In Nephrology and critical care, assessing oxygenation status relies on the 5x Rule, where the expected pO2 ≈ 5 × FiO2 (e.g., Room Air 20% = ~100 mmHg). 

  • Normal: 80-100 mmHg 
  • Mild: 60-80 mmHg 
  • Moderate: 40-60 mmHg 
  • Severe: < 40 mmHg, requiring immediate intervention 

Additionally, evaluate the Alveolar-Arterial (A-a) Gradient, which measures exchange efficiency between the Alveolus (A) and Artery (a). A wide gradient indicates intrinsic lung disease (like ARDS or fibrosis) or a V/Q mismatch, and this can occur even if the Chest X-Ray is normal. 

Step 2: Ventilation Status 

Ventilation status in Nephrology diagnostics is defined solely by pCO2. Normal pCO2 is between 35-45 mmHg, centered around 40 mmHg. 

Hyperventilation: Defined as < 35 mmHg, representing excessive CO2 washout. A physiological exception is pregnancy, where normal pCO2 is 32-35 mmHg. 

Hypoventilation: Defined as > 45 mmHg, representing hypercarbia or CO2 retention. This can occur with normal lungs if the respiratory drive is suppressed (e.g., raised ICP). 

In the context of Nephrology and acid-base disorders, if a patient’s ABG reveals a High Anion Gap Metabolic Acidosis (HAGMA), but the delta analysis shows Δ Bicarb > Δ AG, what is the hidden concurrent disorder? 

The presence of a larger fall in bicarbonate compared to the change in the anion gap (Δ Bicarb > Δ AG) implies that the bicarbonate fell too much. In clinical Nephrology, this indicates a concurrent hidden Normal Anion Gap Metabolic Acidosis (NAGMA). 

Acid-Base Landscape and Compensation in Nephrology 

The balance of pH is driven by two opposing components: the Respiratory system (driven by pCO2) and the Metabolic system (driven by bicarbonate). Nephrology residents must remember a fundamental reporting rule: compensation is a response, not a second disorder. For example, report “Metabolic Acidosis with compensatory Respiratory Alkalosis” rather than “Metabolic Acidosis and Respiratory Alkalosis”. 

The Rules of Compensation 

The body uses the opposite system to correct the primary disturbance. The goal of compensation is to normalize pH, but it rarely overcorrects. 

Rule Type Direction of Change Description 
Metabolic Rule SAME DIRECTION The compensatory change parallels the primary change. pH, Bicarb, and pCO2 move in the SAME direction. 
Respiratory Rule OPPOSITE DIRECTION The compensatory change opposes the pH change. pH moves OPPOSITE to pCO2 and Bicarb. 

Metabolic Acidosis: The Deep Dive 

When Metabolic Acidosis is identified, the next step in Nephrology protocol is to calculate the Anion Gap (AG), where a normal AG is typically < 12 mEq/L. 

  • HAGMA (High Anion Gap > 12 mEq/L): The next step is to perform Delta Analysis. Common causes include Lactic Acidosis, DKA, Renal Failure, and Toxins like Methanol or Ethylene Glycol. If Δ AG > Δ Bicarb, it means bicarbonate didn’t fall enough, implying concurrent Metabolic Alkalosis. 
  • NAGMA (Normal Anion Gap < 12 mEq/L): The next step is to calculate the Urinary Anion Gap to determine the etiology (Renal vs. Extra-Renal causes). 

Calculating the Urinary Anion Gap 

To evaluate NAGMA, calculate Urinary Anion Gap = Na+ + K+ – Cl-, ignoring urinary bicarbonate. 

  • Positive / High Result: Indicates the kidney cannot handle acid, pointing to Renal Tubular Acidosis (RTA). Other causes include Acetazolamide, Amphotericin B, or Uretero-sigmoidostomy. 
  • Negative / Low Result: Indicates extra-renal bicarb loss, typically due to diarrhea. 

Acute Kidney Injury (AKI) in Nephrology 

AKI represents an acute decline in renal function leading to dysregulation of water, electrolytes, and acid-base. 

KDIGO Criteria 

The KDIGO criteria are essential for Nephrology residents diagnosing AKI. It is defined by: 

  • Serum Creatinine Criteria: A rise >= 0.3 mg/dL within 48 hours, or a rise >= 1.5x baseline within 7 days. 
  • Urine Output Criteria: A fall to < 0.5 mL/kg/hour for 6 hours. Note that Urine Output is the more sensitive early marker. 

Staging Challenges: Adult vs. Pediatric Nephrology 

In adults, KDIGO / RIFLE staging is based on the serum creatinine fold-increase. Stage 3D indicates the initiation of dialysis (RRT). In pediatric Nephrology, the pRIFLE criteria are used because low muscle mass makes raw serum creatinine unreliable. Therefore, staging is based on Estimated Creatinine Clearance (eCCl) using the Schwartz Formula, with modified windows for urine output checks (8hr and 16hr). 

Anatomical Classification of AKI 

Classification Primary Issue Key Characteristics 
Pre-Renal Circulation (Most Common) Hemodynamic issue with no parenchymal damage initially. Key cause is Dehydration / Hypovolemia. Severe pre-renal insults can evolve into intrinsic ATN. 
Intrinsic Parenchyma Structural damage. Key cause is Acute Tubular Necrosis (ATN). 
Post-Renal Outlet Obstruction, primarily falling under the surgical domain. 

Exploring Intrinsic AKI and Nephrotoxic Hazards 

The most common intrinsic cause of AKI is Acute Tubular Necrosis (ATN), where the pathology is predominantly apoptosis (granular casts) rather than true necrosis. Nephrology residents can remember the causes of Intrinsic AKI using the I-I-T mnemonic: 

  • Ischemia: Prolonged pre-renal AKI (Common). 
  • Infection: Sepsis (Multifactorial). 
  • Toxins: Exogenous (Contrast, Aminoglycosides) or Endogenous (Myoglobin, Uric Acid). 

Other intrinsic targets include the Interstitium (leading to Acute Interstitial Nephritis, often an idiosyncratic drug allergy), the Glomeruli (Glomerulonephritis due to inflammation), and the Vessels (Vasculitis, TMA, Malignant Hypertension). 

Pre-Renal Mechanism and Hemodynamic Triggers 

Pre-renal AKI is driven by decreased filtration pressure (GFR) due to autoregulation failure. Causes include volume loss (vomiting, diarrhea, hemorrhage), cardiac issues (heart failure), hyperviscosity (myeloma), and hepato-renal syndrome. 

Pharmacological impacts on this mechanism are vital in Nephrology: NSAIDs block prostaglandins, leading to constriction of the afferent arteriole. Conversely, ACEi/ARBs block Angiotensin II, leading to dilation of the efferent arteriole. Vulnerable patients include those over 75, diabetics, or those with pre-existing CKD. Hemodynamic triggers include an SBP < 80 mmHg for > 1 hour, anemia, or requirement for inotropes/IABP.  

Procedural hazards like contrast also pose risks, with high osmolar contrast being the highest risk and iso-osmolar being the safest. High risk is associated with volumes > 100mL or intra-arterial administration. 

Frequently Asked Questions (FAQs) 

1. What is the Henderson-Hasselbalch reliability check in Nephrology ABG analysis? 

It is a formula used to verify that the pH, bicarbonate, and pCO2 values are chemically locked; if the result falls outside 24 ± 2, independent errors make the result impossible, and the sample must be repeated. 

2. What does a wide Alveolar-Arterial (A-a) gradient signify? 

A wide gradient signifies intrinsic lung disease, such as ARDS or fibrosis, or a V/Q mismatch. This can occur even if the Chest X-Ray is normal. 

3. How does Nephrology define hyperventilation based on pCO2? 

Hyperventilation is defined solely by a pCO2 of < 35 mmHg, representing excessive CO2 washout. 

4. What is the reporting rule for acid-base compensation? 

Compensation is a physiological response, not a second disorder. It must be reported as a compensatory mechanism, not as an independent secondary condition. 

5. In Nephrology, what does a positive Urinary Anion Gap indicate? 

A positive or high Urinary Anion Gap indicates that the kidney cannot handle acid, pointing to a diagnosis of Renal Tubular Acidosis (RTA). 

6. What are the KDIGO criteria for Acute Kidney Injury (AKI)? 

KDIGO defines AKI as an acute rise in serum creatinine >= 0.3 mg/dL within 48 hours, a rise >= 1.5x baseline within 7 days, or a fall in urine output to < 0.5 mL/kg/hour for 6 hours. 

7. Which is a more sensitive early marker for AKI: Serum Creatinine or Urine Output? 

Urine Output is considered the more sensitive early marker for identifying AKI. 

8. How does pediatric AKI staging differ from adult staging? 

Adults use serum creatinine fold-increase for staging, whereas pediatrics use Estimated Creatinine Clearance (eCCl) based on the Schwartz Formula, because low muscle mass in children makes raw serum creatinine unreliable. 

9. What is the “I-I-T” mnemonic for Intrinsic AKI? 

The I-I-T mnemonic stands for Ischemia (prolonged pre-renal AKI), Infection (Sepsis), and Toxins (Exogenous like contrast, or Endogenous like myoglobin). 

10. How do NSAIDs and ACE inhibitors affect renal hemodynamics? 

NSAIDs block prostaglandins, causing constriction of the afferent arteriole. ACE inhibitors and ARBs block Angiotensin II, causing dilation of the efferent arteriole, both of which decrease filtration pressure (GFR). 

DocTutorials App Download Now

Latest Blogs

Essential Medical Oncology for PG Residents: Managing CINV and Febrile Neutropenia 

Medical Oncology for PG Residents

Medical oncology is a highly dynamic and demanding specialty where mastering supportive care is just as critical as understanding primary antineoplastic agents. For PG residents navigating the daily complexities of medical oncology, managing treatment-related toxicities is a persistent and critical challenge. This comprehensive guide delves deeply into two of the most high-yield topics in medical oncology: Chemotherapy-Induced Nausea and Vomiting (CINV) and Febrile Neutropenia (FN).  

By thoroughly understanding the underlying pathophysiology, evaluating patient risk factors, and applying current guidelines, residents can significantly improve patient outcomes and ensure strict treatment adherence in their medical oncology practice. 

Get High Quality, High Yield Medical Oncology PG Residency Notes for Free! 

Understanding Chemotherapy-Induced Nausea and Vomiting (CINV) 

While CINV is not typically fatal, its profound impact on a patient’s quality of life makes it a primary focus in medical oncology. CINV is driven by a complex reflex arc coordinated entirely by the brainstem.  

Pathophysiology and Key Neurotransmitters 

In medical oncology, recognizing this neural pathway is vital for effective pharmacological intervention. The Chemoreceptor Trigger Zone (CTZ) is centrally located in the Area Postrema, which is at the caudal 4th ventricle. A defining feature of the CTZ is that it lacks a blood-brain barrier. This anatomical exception makes it highly accessible to blood-borne chemotherapy toxins.  

Once the CTZ is stimulated, afferent signals are sent to the Vomiting Center, located in the Medulla’s Lateral Reticular Formation. Here, the nucleus tractus solitarius takes over, coordinating efferent signals that ultimately lead to emesis.  

Effective pharmacological intervention in medical oncology relies heavily on understanding the Lock and Key Mechanism of the involved neurotransmitters: 

  • Dopamine: Targets the D2 Receptor. In medical oncology, this pathway is often antagonized by Olanzapine.  
  • Serotonin (5-HT3): Operates primarily at the peripheral level, targeting the 5-HT3 receptor. It is blocked by 5-HT3 antagonists like Ondansetron, Granisetron, and Palonosetron.  
  • Substance P: Operates at the central level, targeting the NK1 receptor. It is blocked by NK1 Antagonists such as Aprepitant and Rolapitant.  

Phases of Emesis 

A core competency in medical oncology is categorizing the clinical phases of emesis to tailor treatments: 

  • Acute Phase (0-24 Hours): The primary mediators driving this phase are Serotonin (5-HT3) and Dopamine.  
  • Delayed Phase (24-120 Hours): Mediated primarily by Substance P and systemic inflammation. Consequently, steroids are highly effective here.  
  • Anticipatory Emesis: This is a conditioned response occurring before treatment begins, affecting roughly 20% of patients. It is typically managed with Benzodiazepines like Lorazepam.  
  • Breakthrough & Refractory: Breakthrough emesis occurs despite prophylaxis, requiring rescue therapy. Refractory emesis persists despite both prophylaxis and rescue attempts.  

Risk Stratification and Pharmacological Interventions 

Every patient in a medical oncology ward presents with a unique risk profile. Patient factors that amplify the risk of CINV include a history of nausea/vomiting, female sex, younger age, genetic metabolic variations, and low ethanol consumption. Treatment factors such as dose, infusion rate, and route (IV poses a higher risk than Oral) also play a massive role.  

The NCCN Risk Thermometer categorizes emetogenic potential into four tiers: High Risk (>90% frequency), Moderate Risk (30-90% frequency), Low Risk (10-30% frequency), and Minimal Risk (<10% frequency). Specific high emetogenic agents frequently encountered in medical oncology include Cisplatin, Carboplatin (only if AUC is greater than or equal to 4), and the Anthracycline + Cyclophosphamide combination.  

The Multi-Drug Rule in Medical Oncology 

When combining multiple therapies in a medical oncology regimen, the Multi-Drug Rule strictly applies: the entire regimen’s risk is determined by the single agent with the highest emetogenic potential. For instance, combining Adriamycin (Low), Bleomycin (Low), Vinblastine (Low), and Dacarbazine (High) equates to a High-Risk Regimen.  

In daily medical oncology practice, what is the first-line rescue medication for breakthrough CINV when prophylactic measures fail? 

According to established medical oncology protocols, Olanzapine is the Category 1 recommendation for breakthrough CINV. It is superior to Metoclopramide and adds a 25-30% response rate. However, medical oncology practitioners must evaluate the patient profile closely, keeping in mind the risks of sedation, weight gain, and diabetes, avoiding it in uncontrolled blood sugar.  

Prophylactic Regimens Based on Emetogenic Risk 

Emetogenic Risk Profile Regimen Requirement Standard Formula Clinical Examples & Notes 
High Risk (>90%) 3-Drug Regimen NK1 RA + 5-HT3 RA + Steroid OPD (Olanzapine/Palonosetron/Dex) or APO (Aprepitant/Palonosetron/Dex)  
Moderate Risk (30-90%) 2-Drug Regimen 5-HT3 RA + Steroid Exception: Add NK1 RA if the patient has a prior severe emesis history  
Low / Minimal Risk (<30%) Monotherapy Oral Antiemetics OR Dexamethasone Timing is crucial; administer prior to chemo as risk lasts around 3 days  

Clinical Pearls in Medical Oncology Pharmacology 

  • 5-HT3 Antagonists: Palonosetron is a 2nd generation drug with a superior, long half-life. Dolasetron is largely unused in modern medical oncology due to QTc prolongation risks.  
  • NK1 Antagonists: A single IV dose of Fosaprepitant is approximately equal to a 3-day oral dose of Aprepitant. Aprepitant is known to inhibit cytochrome enzymes, which is vital for medical oncology drug interactions.  
  • Steroids: Dexamethasone prevents the inflammation implicated in delayed emesis and is always used in combination with other antiemetics.  

Navigating Febrile Neutropenia in Medical Oncology 

Another absolute cornerstone emergency in medical oncology is Febrile Neutropenia (FN). Neutrophils act as the first line of innate host defense. When they are depleted, infection risks skyrocket, entering a critical Danger Zone.  

Diagnostic Criteria and Hidden Infection Sites 

In medical oncology, FN is rigorously defined as a single oral temperature > 38.3°C, OR a sustained temperature > 38.0°C for at least 1 hour, coupled with an Absolute Neutrophil Count (ANC) < 500 or an expected decrease to < 500 in the next 48 hours. A mandatory calculation for all medical oncology residents is: ANC = Total WBC x % Neutrophils. Do not rely on the Total WBC alone.  

When ANC drops below 500, the patient enters profound neutropenia. A duration of 7-10 days in this state is considered a Ticking Bomb in medical oncology due to the rapid decline in immunity. Because inflammation and pus are often entirely absent, fever may be the ONLY clinical sign of infection. Medical oncology teams must heavily scrutinize hidden sites of infection:  

  • Central Lines / Catheters: Requires high suspicion.  
  • Lungs: Suspect pneumonia.  
  • Gut: Suspect colitis or severe mucositis.  
  • Perianal Area.  

Empirical Management and Triage 

The golden rule of medical oncology for FN is clear: start empirical therapy immediately and do not wait for cultures to return. This rationale significantly reduces mortality. The Pan-Culture workup includes two sets of blood cultures (one central line, one peripheral), a urine culture, a stool sample (if C. diff is suspected), baseline imaging like a Chest X-ray, and monitoring Liver/Renal function every 2-3 days.  

At the triage gate, medical oncology residents must determine if the patient is an outpatient candidate eligible for oral antibiotics via a validated scoring system, or requires mandatory inpatient admission for IV antibiotics.  

Red Flags for Admission in Medical Oncology: 

  1. Prolonged Profound Neutropenia  
  1. Hypotension (Hemodynamic Instability)  
  1. Pneumonia  
  1. ANY Organ Dysfunction  

Empirical antibiotics must be broad-spectrum, bactericidal, and have low side effects. Preferred monotherapy includes Carbapenems or 3rd/4th Gen Cephalosporins like Cefepime or Ceftazidime. Therapy continues until the resolution of neutropenia where ANC > 500.  

Targeted Therapy for Resistant Pathogens in Medical Oncology 

Targeted Pathogen Resistant Bacteria Protocol (Targeted Therapy) Indication for Gram+ Coverage 
MRSA Vancomycin OR Linezolid  Catheters or Skin infection  
VRE Synercid OR Linezolid  Catheters or Skin infection  
Carbapenem-Resistant Colistin OR Tigecycline  Hypotension or Pneumonia  

Additionally, medical oncology practitioners must monitor the Fungal Infection Timeline. Fungal risk begins to surge at Day 3-5 of prolonged neutropenia. Diagnostics include Galactomannan for Aspergillus (treated with Voriconazole or Ampho B) and Beta-glucan for Candida (treated with Caspofungin or Liposomal Ampho B).  

Frequently Asked Questions (FAQs) 

1. What is the CTZ and why is it important in medical oncology?  

The Chemoreceptor Trigger Zone (CTZ) is located in the Area Postrema. Crucially, it lacks a blood-brain barrier, making it directly vulnerable to circulating chemotherapy toxins to trigger emesis.  

2. Which neurotransmitters dominate the acute phase of CINV?  

In medical oncology, Serotonin (5-HT3) and Dopamine are recognized as the primary mediators in the acute phase (0-24 hours) of emesis.  

3. What is the standard medical oncology treatment for delayed emesis?  

Delayed emesis is mediated by Substance P and inflammation; therefore, steroids are highly effective here.  

4. How does the multi-drug rule work in a medical oncology regimen?  

The overall emetogenic risk of a combined chemotherapy regimen is solely determined by the single agent within that regimen possessing the highest emetogenic potential.  

5. What strictly defines Febrile Neutropenia in medical oncology?  

It is defined by a single oral temperature > 38.3°C (or sustained > 38.0°C for at least 1 hour) combined with an ANC < 500 (or expected to drop to < 500 in 48 hours).  

6. Why is total WBC insufficient for diagnosing FN?  

Total WBC does not accurately isolate or reflect true neutrophil reserves. In medical oncology, ANC must always be calculated by multiplying Total WBC by the percentage of Neutrophils.  

7. What are the most common hidden sites of infection in FN?  

Medical oncology residents should thoroughly check central lines/catheters, the lungs, the gut (for colitis/mucositis), and the perianal area.  

8. When should fungal infections be suspected in medical oncology patients?  

Fungal risk significantly begins when profound neutropenia is prolonged for more than 3 to 5 days.  

9. What are the red flags requiring mandatory inpatient admission for FN?  

Red flags include prolonged profound neutropenia, hemodynamic instability like hypotension, pneumonia, or any organ dysfunction.  

10. What is the specific role of Olanzapine in medical oncology CINV guidelines?  

Olanzapine is a Category 1 recommendation that antagonizes Dopamine and 5-HT6, providing a 25-30% added response rate for prophylaxis or breakthrough management. 

DocTutorials App Download Now

Latest Blogs

A Comprehensive Guide to Hematology and Hemato Oncology for PG Residents 

Hematology & Hemato Oncology

In the evolving fields of hematology and hemato oncology, mastering the molecular basis of diseases, interpreting advanced diagnostics, and understanding targeted therapies are non-negotiable skills for clinical excellence. This guide distills high-yield concepts from the subject to enhance your diagnostic acumen. 

Get High Yield Hematology & Hemato Oncology PG Residency Notes for Free!

Chronic Myeloid Leukemia (CML): A Core Focus in Hematology Oncology 

Chronic Myeloid Leukemia (CML) represents a foundational topic in both hematology and hematology oncology. It is defined as a clonal hematopoietic stem cell disorder that is characterized by uncontrolled proliferation.  

From an epidemiological standpoint within hematology, CML has an incidence rate of 1.6 cases per 100,000 individuals. The disease predominantly affects older adults, with a median age at diagnosis of 55 to 65 years. It shows a slight male predominance, presenting a male-to-female gender ratio of 1.6:1. In pediatric hematology oncology, CML is notably rare, accounting for less than 3% of all cases. 

Pathophysiology and Hematological Findings 

The pathogenesis of CML is a classic model of targeted molecular aberrations in hematology oncology. The primary driver is the reciprocal translocation t(9;22)(q34;q11), which creates the Philadelphia Chromosome (Ph). This translocation results in the BCR-ABL1 fusion protein, which acts as a powerful oncoprotein. This fusion creates a constitutively active tyrosine kinase, leading directly to uncontrolled cellular proliferation.  

Clinically, hematology practitioners must maintain a high index of suspicion because approximately 50% to 60% of patients are completely asymptomatic and are only detected incidentally via a standard Complete Blood Count (CBC). When symptoms do appear, patients may present with constitutional symptoms such as fatigue and weight loss, alongside hyperviscosity in cases of severe leukocytosis. Splenomegaly remains the most common physical sign encountered during clinical examination.  

Upon reviewing a mock CBC panel in a hematology oncology setting, a classic CML presentation includes a significantly elevated WBC count of greater than 100,000/µL and variably elevated platelets. Basophils are often increased, and a basophil count exceeding 20% indicates the accelerated phase of the disease. Hemoglobin levels often reveal variable anemia.  

How do we differentiate Chronic Myeloid Leukemia (CML) from a leukemoid reaction in a clinical hematology setting?  

The key distinguishing factor lies in the chemistry and special panels. In CML, the Leukocyte Alkaline Phosphatase (LAP) score is low, which clearly differentiates it from a leukemoid reaction. Additionally, serum B12 levels are characteristically elevated in CML.  

Bone Marrow Diagnostics and Genetic Variants 

In a normal hematology marrow evaluation, you will find moderate cellularity, a balanced 3:1 myeloid to erythroid ratio, fat spaces, and fewer large-erythroid precursors. Conversely, a CML marrow exhibits marked hypercellularity with minimal fat spaces, a vast expansion of myeloid cells at all stages (including immature forms), and a drastically altered myeloid to erythroid ratio of 20:1 with very few erythroid islands.  

Understanding the specific BCR-ABL1 fusion variants is critical in hematology oncology for proper disease association. 

BCR-ABL1 Fusion Variants & Disease Associations 

Fusion Protein (Size) Breakpoint Disease Association in Hematology Oncology 
Minor BCR (P190)  e1a2  Ph+ ALL (Acute Lymphoblastic Leukemia)  
Major BCR (P210)  e13a2/e14a2  Classical CML  
Micro BCR (P230)  Telomeric breaks  Indolent CML (Rare)  

Advanced Response Assessment and TKI Pharmacology 

In hematology oncology, treating CML requires rigorous molecular monitoring. Evaluating the log reduction of tumor burden is standard practice. A Hematologic Response (CHR) means a normal CBC and no splenomegaly. A Cytogenetic Response (CCyR) indicates 0% Ph+ metaphases alongside a normal CBC and no splenomegaly.  

Molecular milestones are strictly tracked using PCR monitoring on the International Scale (IS). A Major Molecular Response (MMR) is achieved at a 3-log reduction (≤0.1%). Deep Molecular Responses are categorized as MR4 (4-log reduction, ≤0.01%) and MR4.5 (4.5-log reduction, ≤0.0032%). Achieving deep remission (>MR4.5) sustained for at least 2 years qualifies a patient for Treatment-Free Remission (TFR) eligibility, where TKIs can be stopped under monthly PCR monitoring, yielding a success rate of roughly 50% to 60%.  

Tyrosine Kinase Inhibitors (TKIs) are the cornerstone of hematology oncology treatment for CML. However, resistance can develop, most notably via the T315I mutation at the ATP-binding pocket.  

Tyrosine Kinase Inhibitors (TKIs): Pharmacology and Side Effects 

Generation / Agent Key Side Effects & Toxicity T315I Activity 
1st Gen: Imatinib  Fluid retention, Muscle cramps, GI upset (Well tolerated)  Ineffective (X)  
2nd Gen: Nilotinib  Vascular events (PAOD, Coronary), Metabolic syndrome  Ineffective (X)  
2nd Gen: Dasatinib  Pleural Effusion, Pulmonary HTN  Ineffective (X)  
2nd Gen: Bosutinib  GI Toxicity (Diarrhea), Liver enzyme elevation  Ineffective (X)  
3rd Gen: Ponatinib  Arterial occlusive events (High Risk)  Effective (✓)  

Hemoglobinopathies: Sickle Cell Anemia Diagnostics 

Shifting focus from hematology oncology to classical hematology, the diagnosis and management of hemoglobinopathies like Sickle Cell Anemia are vital. The primary diagnostic tool utilized is High-Performance Liquid Chromatography (HPLC).  

HPLC Interpretation and Transfusion Caveats 

In hematology, separation via HPLC is based on the globin chain’s weight and charge defect. An Hb SS diagnosis requires a predominant S window of greater than 50%, coupled with the complete absence of HbA.  

A critical clinical note for any hematology resident: HPLC performed on recently transfused patients will show a mixed picture. To accurately distinguish a homozygote from a compound heterozygote, you must wait 3 months for a complete washout, or alternatively, screen the patient’s parents.  

Understanding Sickle Cell Variants 

Hematology practice frequently encounters various genetic presentations of sickle cell disease. 

  • HbAS (Trait): Clinically benign and asymptomatic. It features a normal CBC but carries a risk of hematuria, while offering protection against Malaria.  
  • Hb S-Beta Thal: Exhibits moderate to severe clinical severity. It resembles Hb SS but is characterized by a low MCV and the presence of splenomegaly (lacking auto-splenectomy).  
  • HbSC Disease: A moderate condition with better overall survival than SS. It stems from a Glu to Lys mutation, carrying risks for retinal issues and thrombosis, and its peripheral smear reveals Target Cells and Rhomboid Crystals.  
  • HbE: A mild condition highly common in SE Asia, generally presenting with microcytic anemia.  

Frequently Asked Questions (FAQs) 

1. What is the standard incidence rate of CML in hematology oncology?  

The incidence is 1.6 cases per 100,000 individuals.  

2. Which translocation drives Chronic Myeloid Leukemia?  

The t(9;22) (q34;q11) reciprocal translocation, which creates the Philadelphia Chromosome.  

3. What is the most frequently observed physical sign in CML?  

Splenomegaly is the most common physical sign upon examination.  

4. How does Leukocyte Alkaline Phosphatase (LAP) aid in CML diagnosis?  

The LAP score is low in CML, which effectively differentiates it from a leukemoid reaction.  

5. What is the myeloid to erythroid ratio seen in a typical CML bone marrow?  

The ratio shifts dramatically to 20:1, compared to a normal 3:1 ratio.  

6. At what blast percentage is a CML patient considered to be in Blast Crisis?  

A blast crisis is diagnosed when there are ≥20% blasts in the blood or marrow.  

7. Which signaling pathways are driven by the BCR-ABL1 kinase?  

It drives the MAPK pathway for cell proliferation, the PI3K-AKT pathway for survival, and the STAT pathway for leukemogenesis.  

8. Which TKI is utilized in hematology oncology to overcome the T315I resistance mutation?  

Ponatinib, a 3rd generation TKI, is effective against the T315I mutation.  

9. How is Sickle Cell Anemia (Hb SS) strictly diagnosed using HPLC?  

It is diagnosed by finding a predominant S window (>50%) and the absence of HbA.  

10. What is the crucial wait time for HPLC testing after a blood transfusion?  

You must wait 3 months for a washout period before testing to avoid a mixed diagnostic picture. 

DocTutorials App Download Now

Latest Blogs

Mastering Gastroenterology & Hepatology: Essential Clinical Notes for PG Residents 

Gastroenterology & Hepatology

Navigating the complexities of Gastroenterology & Hepatology is a critical milestone for any PG resident. Whether you are actively managing patients in the Department of Gastroenterology or preparing for your residency exams, having access to structured, high-yield information is vital. This guide delves into core concepts of Gastroenterology & Hepatology, aiming to elevate your clinical acumen within the Department of Gastroenterology. 

Get High Quality, High Yield Gastroenterology & Hepatology Notes for Free! 

Acute Pancreatitis: Diagnostics and Management 

Definition and Diagnostic Criteria 

Acute pancreatitis is defined as pancreatic injury followed by acute inflammation. In the Department of Gastroenterology, confirming this diagnosis requires the presence of at least two out of three specific criteria.  

These diagnostic criteria include clinical signs (typical abdominal pain), biochemical markers (lipase or amylase greater than three times the upper limit of normal), and radiological evidence (CT/MRI imaging consistent with pancreatitis).  

Classifying Fluid Collections 

Understanding the terminology of fluid collections is essential for any resident in the Department of Gastroenterology. The Revised Atlanta Classification categorizes these collections based on content type and the duration of the injury.  

Content Duration: < 4 Weeks Duration: > 4 Weeks 
Fluid Only Acute Peripancreatic Fluid Collection: Low attenuation, no defined wall.  Pseudocyst: Persisting fluid with a developed wall.  
Solid/Necrotic Acute Necrotic Collection: Fluid solid components crossing fascial planes.  Walled-Off Necrosis (WON): Necrotic collection with a defined wall.  

Imaging Strategy and Timing 

When a patient presents the Department of Gastroenterology with acute pancreatitis, an initial ultrasound of the abdomen is recommended at the onset or admission. The primary goal of this ultrasound is to visualize the gallbladder and rule out any biliary pathology.  

When is the optimal time to perform a CT scan for a patient suspected of having severe acute pancreatitis?  

Answer: You should not scan too early. A CT scan is best utilized after 72 hours, as necrosis is best visualized after this time window to stage severity properly.  

For follow-up or specific indications, an MRI or EUS is the modality of choice. This is superior for visualizing fluid collections, debris, and choledocholithiasis, and is also used in idiopathic cases (8-12 weeks post-episode) to rule out microlithiasis or tumors.  

Management Protocols in the Department of Gastroenterology 

The First 24-Hour Protocol 

Initial management in Gastroenterology & Hepatology focuses heavily on robust fluid resuscitation. Aggressive hydration using Ringer’s Lactate (5-10 mL/kg/hr) is recommended because it reduces acidosis and trypsin activation. During this phase, you must monitor urine output and hematocrit decrease.  

While administering supportive care, such as opiates (Fentanyl/Hydromorphone) for analgesia and oxygen to maintain saturation, remember that medications like antibiotics are not strictly routine. Antibiotics should only be used if there is an infection, and vasopressors are indicated if there is fluid-refractory hypotension.  

Nutrition Strategy 

Early feeding within the first 24 hours is the preferred strategy in Gastroenterology & Hepatology. If the patient tolerates it, an oral diet is highly preferred.  

If the patient is intolerant or vomiting, enteral feeding via an NG tube should be initiated. If that fails, move to an NJ tube (post-pyloric), reserving TPN strictly as a last resort.  

Evaluating Liver Health in Gastroenterology & Hepatology 

Hepatocellular vs. Cholestatic Injury 

A significant portion of a resident’s time in the Department of Gastroenterology is spent evaluating liver enzymes. Liver injury is broadly divided into hepatocellular and cholestatic patterns.  

Hepatocellular injury occurs inside the hepatocyte and is characterized by elevated AST and ALT levels. The etiologies for this include viral infections, toxins like paracetamol, ischemia, metabolic disorders such as Wilson’s disease, and autoimmune conditions.  

Conversely, cholestatic injury occurs at the canaliculus or bile ducts and is marked by elevated ALP. Cholestatic injury is further subtyped into intrahepatic and extrahepatic origins.  

Feature Extrahepatic (Obstruction) Intrahepatic (Liver Disease) 
Clinical Context Rule out first (Treatable). Biliary surgery history, fever/pain (cholangitis), mass.  Viral prodrome, hepatotoxins, and portal hypertension.  
Lab Key (INR) INR normalizes with Vitamin K.  INR may NOT correct with Vitamin K.  
Causes Stones, Strictures (PSC), Cancer.  Viral, Drug-induced, Genetic.  
Diagnostics Imaging (US/MRCP).  Biopsy / Serology.  

It is crucial for trainees in Gastroenterology & Hepatology to quickly differentiate between extrahepatic obstruction and intrinsic liver disease for proper patient routing.  

Approach to Isolated Hyperbilirubinemia 

When evaluating jaundice with normal AST, ALT, and ALP in the Department of Gastroenterology, you must look at the percentage of direct bilirubin.  

If the direct bilirubin is less than 15% of the total (unconjugated), it suggests an increased load (such as hemolysis via G6PD, hematoma, or ineffective erythropoiesis), defective conjugation (such as Gilbert Syndrome or Crigler-Najjar), or uptake inhibition due to drugs like Rifampicin. If it is greater than 15% (conjugated), causes like Rotor Syndrome or Dubin-Johnson Syndrome should be considered.  

Approaching Elevated ALP in the Department of Gastroenterology 

When a patient in the Department of Gastroenterology presents with elevated ALP, a structured approach is necessary to confirm the origin and etiology. The first step is to check GGT or 5′-nucleotidase. If these are normal, the source is likely a bone source.  

If elevated, a hepatic origin is confirmed, prompting imaging via US or MRCP. Dilated ducts on imaging point toward extrahepatic issues like stones, PSC, or malignancy. Normal ducts suggest intrahepatic conditions, prompting the need to check AMA (Antimitochondrial Antibody) to diagnose Primary Biliary Cholangitis (PBC).  

Frequently Asked Questions (FAQs) 

1. What is the preferred biochemical marker for diagnosing acute pancreatitis in Gastroenterology & Hepatology?  

Serum Lipase is the preferred marker due to its superior specificity compared to amylase.  

2. Does combining Amylase and Lipase tests improve diagnostic accuracy?  

No, a key clinical pearl in the Department of Gastroenterology is that combining Amylase and Lipase does not improve diagnostic accuracy.  

3. What are the primary causes of acute pancreatitis?  

The primary causes of acute pancreatitis are gallstones and alcohol.  

4. How do drug-induced acute pancreatitis typically present?  

It usually presents a hypersensitivity reaction with an onset of 4-8 weeks and is not dose-related, with the exception of steroids, which are dose-dependent.  

5. What does a BISAP score indicate in acute pancreatitis?  

A BISAP score ranging from 0-5 is used for severity scoring, where a score of greater than or equal to 3-4 indicates an increased mortality risk.  

6. What are the components of Phase 1 in the progression of acute pancreatitis?  

Phase 1 involves SIRS (Systemic Inflammatory Response Syndrome) and organ failure, where mild cases generally resolve.  

7. Which systemic complication of pancreatitis can mimic alcohol withdrawal? 

Pancreatic psychosis is a complication that can cause hallucinations and disorientation, closely mimicking alcohol withdrawal symptoms.  

8. When is an ERCP indicated for a patient with biliary pancreatitis?  

An ERCP is indicated within the first 72 hours if the patient has concurrent cholangitis or biliary obstruction.  

9. How does the INR response differ in extrahepatic versus intrahepatic cholestasis?  

In extrahepatic cholestasis, the INR normalizes with Vitamin K administration, whereas in intrahepatic disease, the INR may not correct with Vitamin K.  

10. What is Purtscher Retinopathy?  

Purtscher Retinopathy is a complication seen in Gastroenterology & Hepatology patients caused by microembolization, leading to flame hemorrhages and sudden blindness. 

DocTutorials App Download Now

Latest Blogs

NEET PG Online Live Power Pack
DocTutorials App Download Now